
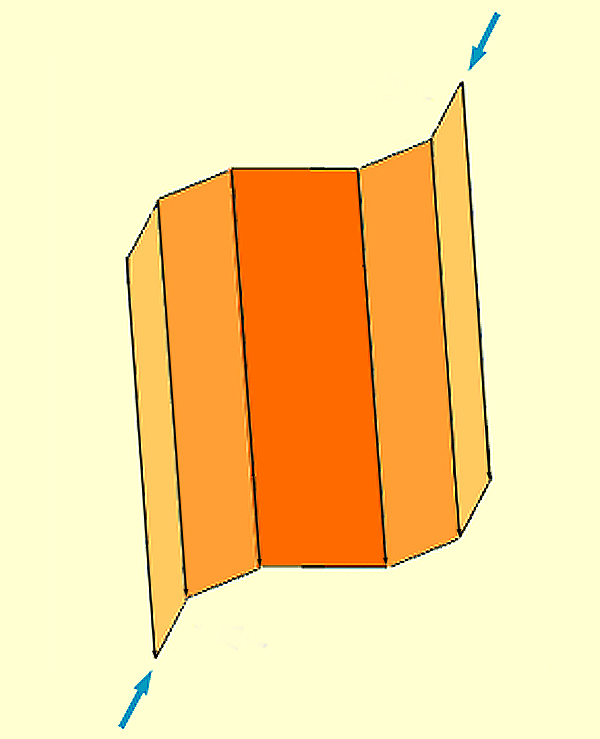
Here’s a paradoxical image to introduce the subject of drawing illusions in Photoshop CS3. The two arrows are objectively aligned, and if you try to ignore the folding screen shape in between, they look to me not so far off that. But now look at the short segments of the folding screen that they line up with. Those segments are also aligned, but concentrate on them and they look so far out of alignment to me, I have to keep checking I haven’t got the figure wrong! It’s a turbo variant of the Poggendorff illusion.
I like to draw my figures in Photoshop CS3, because I’ve already got it, and it’s on many people’s machines if I’m on the move. But it’s not designed primarily for that sort of drawing, especially of geometric shapes, like the ones in the illusion above, so it’s not always ideal. However, I can always find a way of doing what I want, so here is the first of a series of posts, with hints about things I found tricky at first. However, as you’ve surely discovered, there are often lots of ways of doing the same thing in CS3. I’m no Photoshop expert, and if you know a better way, please leave a comment.
Let’s start with drawing geometric shapes. There’s a special tool for those:

What I found hard to get used to is that CS3 handles everything you draw with this shape tool the way it handles type. Whatever shape you make, by clicking, holding and dragging and then releasing, appears in what is called vector mode. You can move it around, using the Move tool (arrow) at the top of the tool box, or transform it in various ways by selecting Edit in the menu bar, and then Transform Path, and then Rotate, or whatever. But there’s a lot you can’t do in vector mode. You can’t use the eraser, change colour, or generally use the painting commands you’re used to. For that, you have to transform your shape into bitmap mode. In the menu bar, go to Layer, then Rasterize, and finally Layer.
CS3 has another quirk as an illusion drawing package. Unless I’ve missed something, you can’t draw a shape such as a rectangle just in outline. When you use the rectangle tool, CS3 always fills in the shape. My workaround for that is, once I’ve rasterized the shape, to select it, then in the Menu Bar go to Select, and then Reduce. Next I’m prompted for how much to reduce the selection area by, and choose, say, 2 pixels. Finally with the selection area shrunk, I just Delete it, to leave the outline. And by the way, don’t forget that to draw a square or circle, use the rectangle or ellipse tool, but hold down the Shift key as you drag.
I’ve avoided a major issue: every Vector shape is drawn in a different layer. I’ll come to my hints on managing layers in a later post.
Finally, there is one way to draw geometric shapes avoiding Vector mode. Use the square or elliptical marquee tool (top left in the ToolBox), again holding down Shift as you drag if you want a square or circle, to draw an empty selection. Then press Alt and Delete at the same time to fill. Then, to reduce a solid shape to outline, just repeat the shrink-and-delete procedure above. For a solid line, just start with a very thin marquee rectangle – it can be just one pixel wide – and then fill it.
i really don’t understand
I have been learning photoshop for the last one month. Recently our tutor taught us how to make a template in photoshop. But as far as slicing the image is concern, the background consist of single color is much more easier than the background having gradient effect.
Hi David
Here is a very flexible way to draw outline shapes in CS3. which allows you to choose the thickness and hardness of the outline.
Like so much in PS it reads long and complicated but is actually very simple once you have done it a couple of times.
1) Select the shape tool required as per your own method.
2) In the property bar select path mode (The second button from the left with the pen nib in it. If you are not sure about this hover your cursor over it and the name “Paths” will appear.)
3) Draw your shape. It will be drawn as a vector path. You can adjust the size, height and width, of this path with the Move tool just like any object. If you need you can edit and change the shape of the path like any bezier curve using the Direct Selection tool (White Arrow in the tools Palette).
4) Select the brush tool. Set the brush size and hardness you want to use for your outline. Select the colour you want use.
5) Leaving the brush tool selected open the Paths palette. Menu: Windows > Paths. Make sure that “Work Path” is selected and highlighted in the palette.
6) In the Paths palette click the little outline circle button second from left at the bottom of the palette. (If you are not sure which button, hover your cursor over it and the name “Stroke Path with Brush” will appear.) The path will be “stroked” using the brush you defined in 4 above.
7) Check you are happy with the result. If not undo the last action and then repeat steps 4 – 6 adjusting the brush or colour as required.
8) Once you are happy with the result click the Trash button bottom right of the Paths palette to delete the path leaving only the brush stroke in the image.
That’s it. It may not look simple here but it really is ….. and it’s completely flexible.
As we say here in Belgium …. “Et Voilà!”