Note added in March 2011! If you’re new to tessellations, before tackling this post, first watch my later post with an animation of how tessellations work.
What is a tessellation?
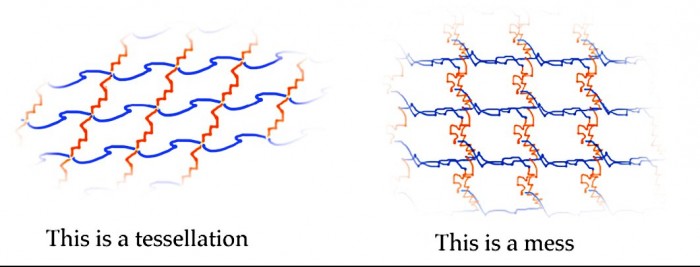
Any regular pattern consists of identical areas, which repeat without overlaps or gaps. An obvious example would be tiles on a wall. However tiles are usually geometric shapes – rectangles or squares as a rule, though triangles or hexagons would be possible too. In a tessellation, the cells can have wiggly edges, but still fit together like jig-saw pieces.
If you try to make a pattern like that out of any old shape, you will either end up with gaps or overlaps:
To make cells that tessellate, you have to follow a recipe. There are a whole set of recipes, but to get an idea of how they work, take a look at just one.
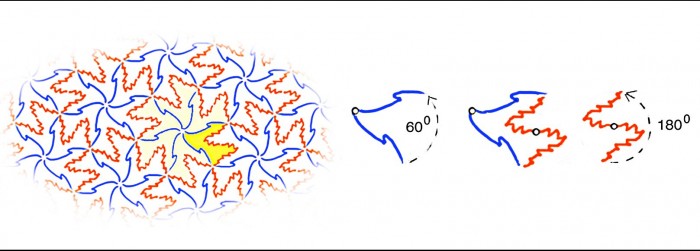
Start from the shape with a rich yellow infill in the pattern on the left. Notice that the rosette it’s part of, with the paler infill, is made just by repeating the rich yellow shape at different orientations. The rich yellow shape is the so-called fundamental domain out of which the entire pattern is made.
When we isolate this fundamental domain, to the right, note next that we can snip its edge into two pairs of segments, one blue, one red. Now consider just the blue pair. Its two segments are identical, and are joined like the hands on an old-fashioned clock-face, so that one is just rotated in relation to the other. The angle between them is 60 degrees. Now look at the red pair. Its two segments are also identical, and also arranged like the hands on an old style clock face. Only this time the angle between them is 180 degrees.
Now it is a fact that any wiggly loop made up of one pair of identical segments set at 60 degrees to one another (always measuring the angle that will end up inside the loop), and one pair of identical segments rotated 180 degrees from one another, will tessellate perfectly. It’s magical! And once you are practiced, you can end up with cells that represent something, as in the famous tessellations by M.C.Escher.
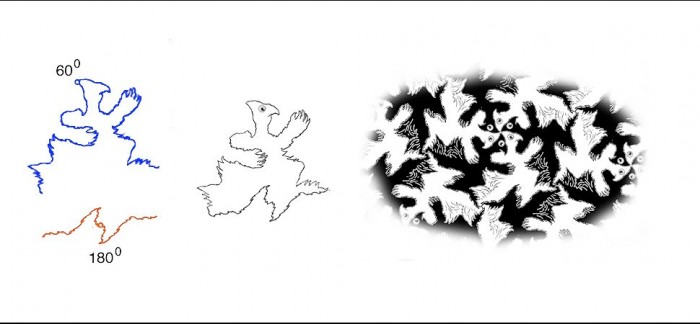
Actually, the tessellating creatures Escher came up with were really brilliant – they’re not easy to devise. Here’s one of my attempts. Not quite up there with Escher? But it does give us an example of a completely different pattern, but following the same recipe. (You’ll see that in this pattern there’s a black/white reversal between adjacent cells. That’s possible whenever the segments in tessellation meet at either six way junctions, or four way junctions. If there are any junctions where just three segments meet, you’ll need three colours if you want to party colour your pattern).
There are actually 28 recipes like this for tessellating patterns that don’t include regular reflections. Each recipe specifies:
– the number of pairs of segments that make up the boundary of the tile;
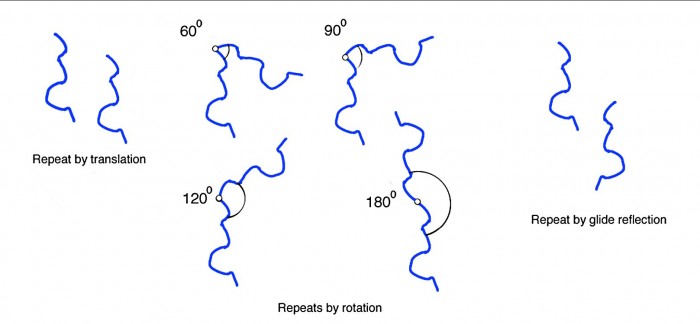
– how each single segment in the boundary repeats to form a pair. Some repeat as in the example above, just by rotation, rotating either 60, 90, 120 or 180 degrees. Other segments repeat to form a pair just by shifting along bit. That’s called translation. Still others repeat by a kind of reflection, called glide reflection, of which more below.
– the sequence, and sometimes the orientation, in which the pairs of segments connect.
– how the whole cell repeats, to produce the tessellation.
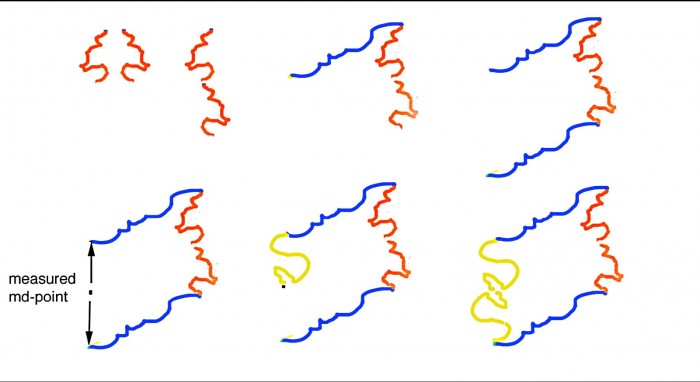
To explore that a bit, let’s make up a cell using the one recipe out of the 28 that combines all three types of repeat, a rotation, a glide reflection and a translation. Start with the glide reflection. We draw a wiggly line, like the red one here, make a copy of it, and flip it over horizontally, as top left in the figure. Next we move the flipped copy downwards, and join up the two red segments.
Now for a translation. Draw a wiggly line, like the blue one centre top here, connected to the top end of the glide reflected, red pair of segments. Copy the blue line, shift the copy downwards, and join it up to the bottom end of the glide reflected pair or segments, as at top right in the figure.
Now for the rotation. First you need to measure the mid-point in between the free ends of your new, translated pair of blue segments. This will be the point around which the final pair of segments will rotate. When you’ve marked the centre point, draw a wiggly line (like the yellow line, centre lower row in the figure), connecting the free end of the upper blue line to the mid point you have just measured.
Copy the new yellow line segment, rotate it 180 degrees, and you will find it will just fit to complete the boundary, as to the right, lower row in the figure. So this recipe is for cells with three pairs of segments: one a repeat by by glide reflection, (red); one a repeat by translation (blue); and one a repeat by a 180 degree rotation, (yellow).
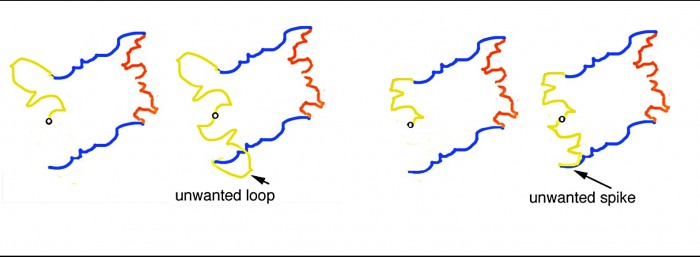
When you try this, there is one complication you may run into. Let’s try a different wiggly line for the first segment in the last, yellow pair.
It looks fine, but when we rotate it, we end up with a loop that makes a mess of our boundary. So then we try another, and this time end up with a nasty spike. Actually, although spikes are usually ugly in patterns, you can do interesting things with loops in tessellations, but to start with it’s simpler to avoid them. So be prepared for loops and spikes to appear when you try to put a copied segment pair in place, and if they do, just try another variant. Pretty soon you’ll get a sense of how to avoid them in the first place, but that takes a little practice.
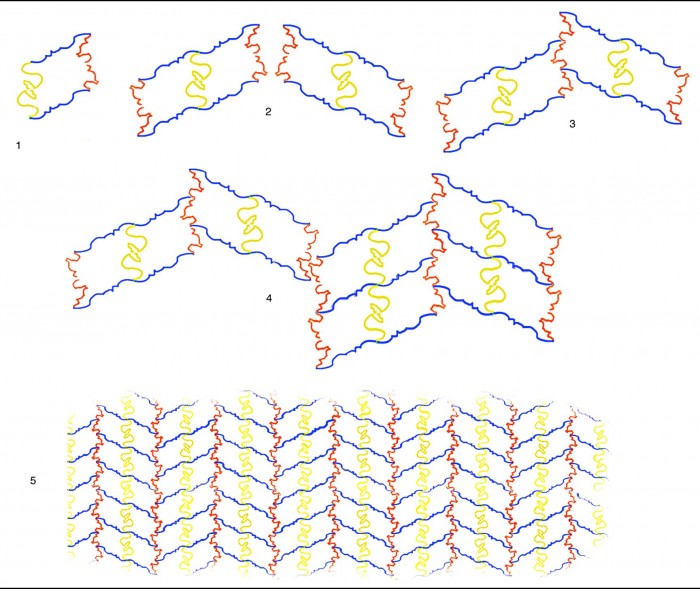
Once you’ve got your boundary right, we just need the specification for turning this cell into a tessellation. First make a copy of the whole cell, rotate it 180 degrees, and join the two resulting cells up along the two yellow pairs of line segments, as (1) and (2) in the figure below. Next copy this joined pair of cells, flip them horizontally, as at (2), glide reflect the copy, and join the two pairs of cells along one of the red line segments, as at (3). You now have a four cell assembly that you can make into an extended pattern just by translation, as if you were adding tiles to a wall, as at (4) and (5).
Finally in this introduction, a further note on glide reflections
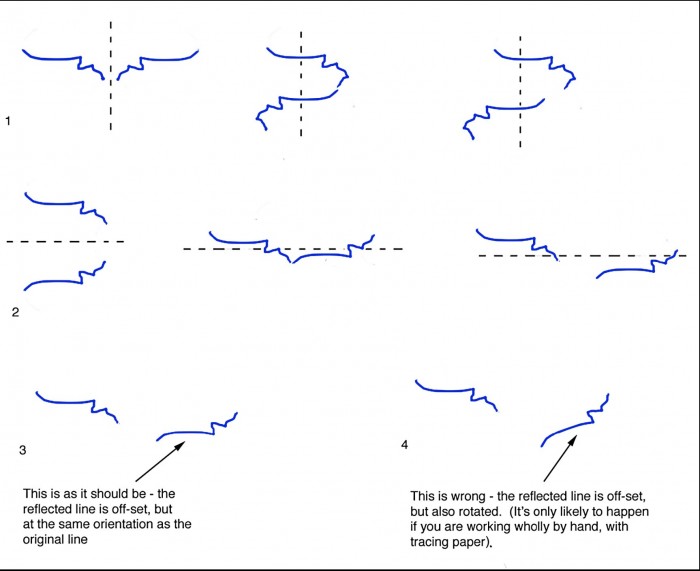
Glide reflections are a bit tricky till you get the hang of them. First note that you either start with a horizontal flip over a vertical mirror line, followed by a vertical off-set, as at (1) in the figure below. Or else start with a vertical flip over a horizontal mirror line, followed by a horizontal off-set, as at (2) below. Note, centre and right in either case, that the flipped line can connect up to the original line (as in the centre) in each case), but does not always have to. The flipped line can just be off-set, as to the right in each example here. When that happens in a tessellation cell, one of the segments from another pair will make the connection between the ends of the glide reflected segments.
Note too, as at (3) and (4), that when the flipped segment is shifted, (vertically if it has been horizontally flipped, or vice versa), it must not be allowed to rotate. That should be taken care of automatically if you are using a computer, but it takes very careful control if you are working by hand just using tracing paper and pencil.
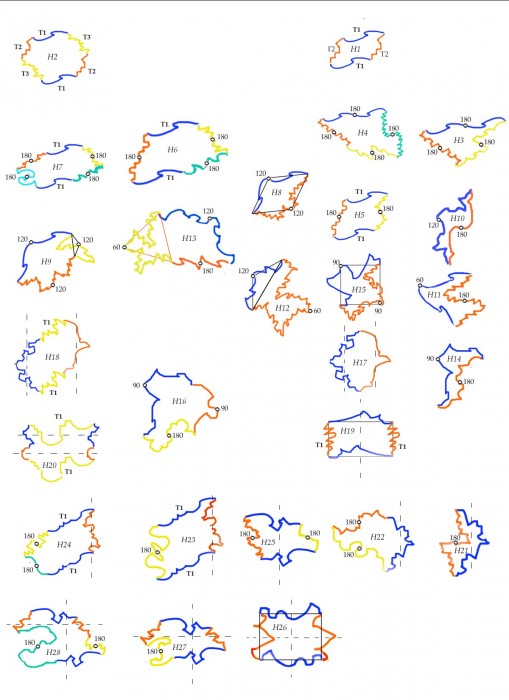
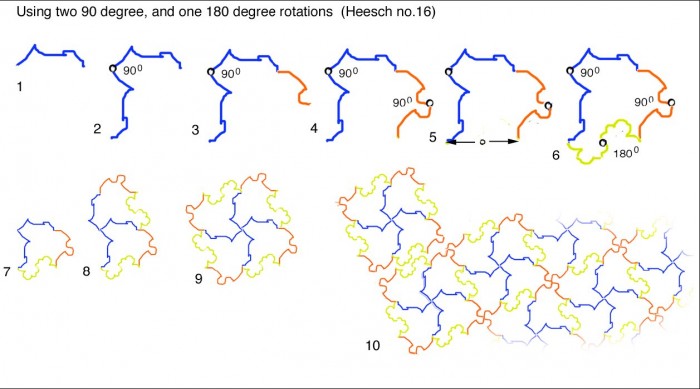
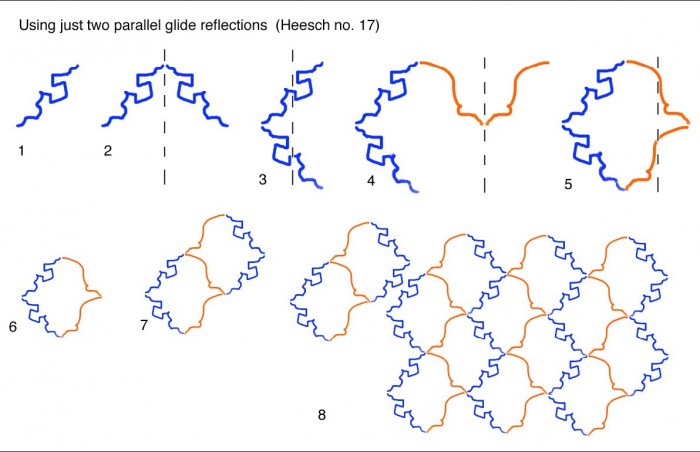
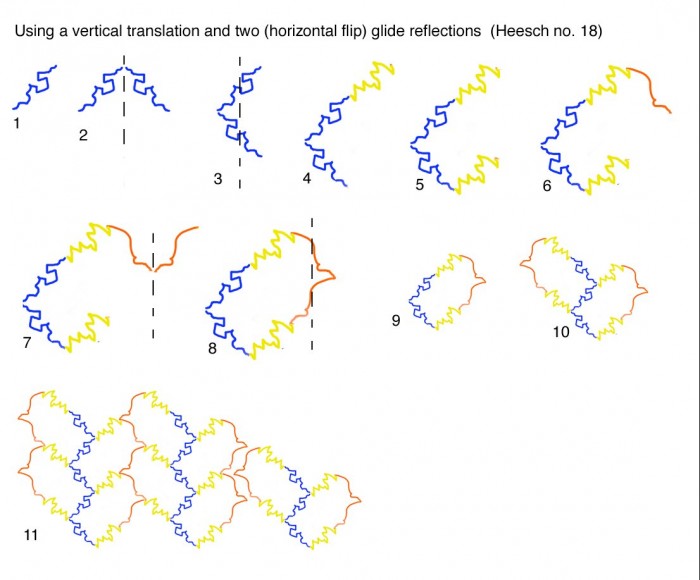
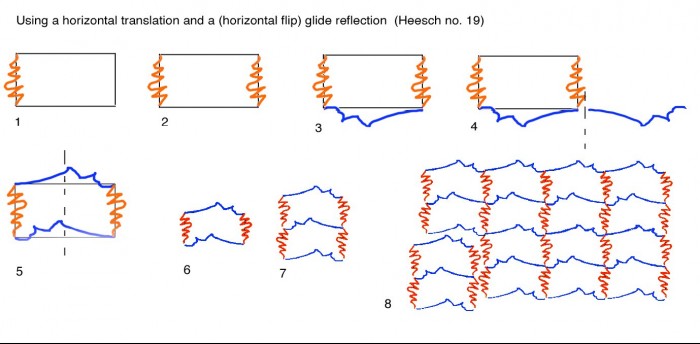
You’ve now seen patterns made with two recipes, one for cells with two pairs of segments, involving just rotations, and one with three pairs of segments, one a rotation, one a glide reflection and one a translation. So now here’s a summary diagram of all 28 recipes, including the two you already know. (Each cell is labelled with an H number. Don’t worry about these, unless you’re a mathematician. They identify the cell number in the scheme followed by mathematician Heinrich Heesch, on whose work this whole presentation is based).
Once you’ve got the hang of tessellations, this diagram may be all you’ll need as a catalogue of the recipes. However, to start with you’ll probably also need the detailed recommended sequence to follow for each recipe, which follows the summary diagram.
In each cell, segments that are just translated are marked T1, T2 or T3 (numbered because you can have up to three pairs of translated segments in some recipes). Segments that are rotated do so around the little circles, (each labelled to show the angle of rotation, as measured inside the boundary). Segments that are glide reflected are indicated by a broken line. (Each line shows the line of reflection before the segments are shifted vertically or horizontally. So, for example, a vertical broken line shows the axis over which the first line segment is flipped horizontally, before being shifted vertically).
In more detail, taking the recipes one by one:
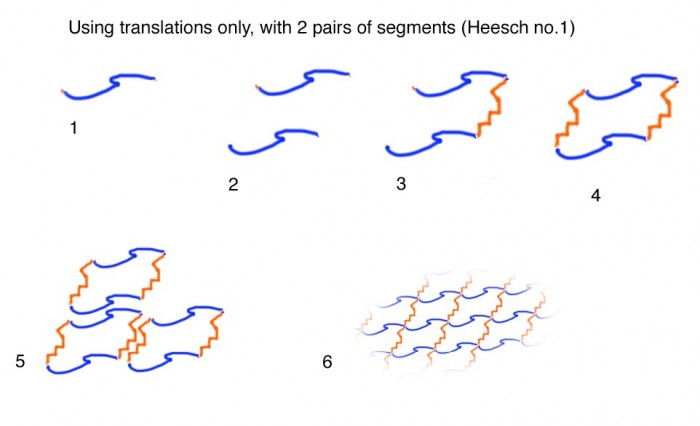
This is the easiest one. The next is almost the same:
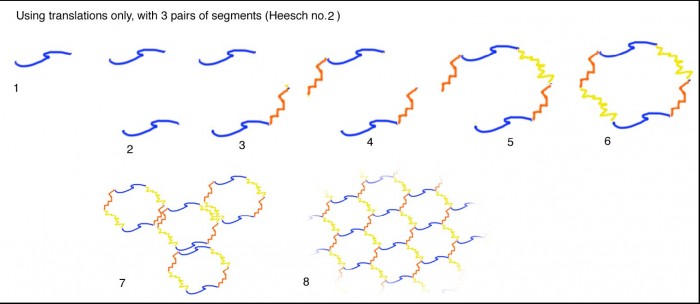
Now it gets a bit more interesting:
First notice that at stage no. 5, you have to measure the centre point between the free ends of the blue and yellow segments. The first red segment must connect with one of those ends and the centre point.
When you rotate your copy of the red segment, you may find you have an unwanted loop or spike where it closes the loop. See above for that – you just need to try different red segments till you get one that connects cleanly.
Then at stage 8, note that you have to copy your cell, rotate the copy 180 degrees and join it to the original cell to make a twosome before you have a shape that will just tessellate like a tile.
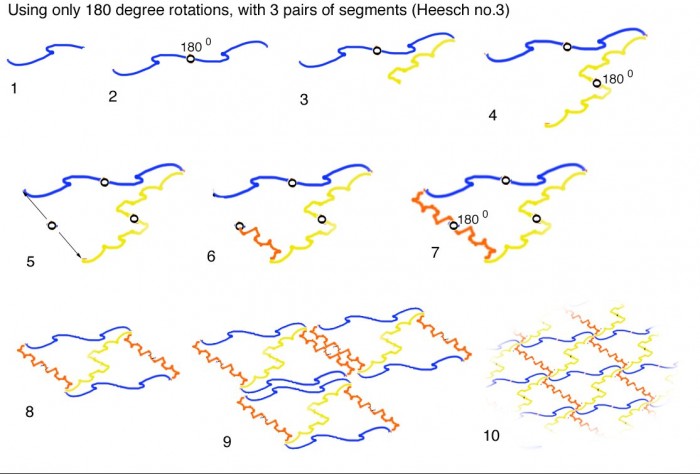
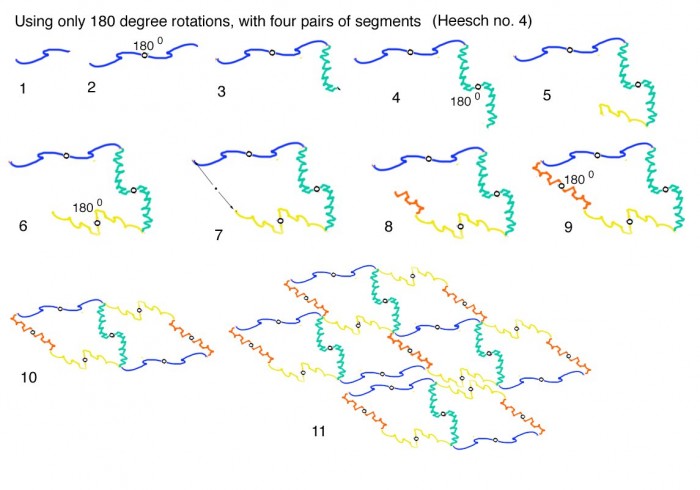
No. 4 just has one extra pair of segments:
As before, this time at stage 7, you have to measure the centre point around which your final, red pair of segments will rotate. As before, at stage 10 here you have to duplicate your cell, rotate the copy 180 degrees and connect it to your original cell, to form a twosome, which then tiles just by translation.
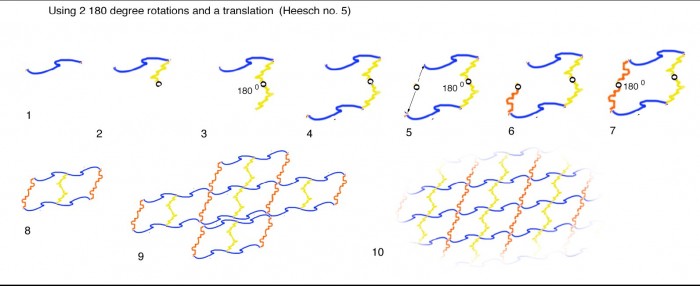
Now we have the first combination of varieties of segment repeat:
Once again, now at stage 8, your single cell has to be duplicated, the copy rotated 180 degrees and joined to the original, to make a twosome that tiles by translation only.
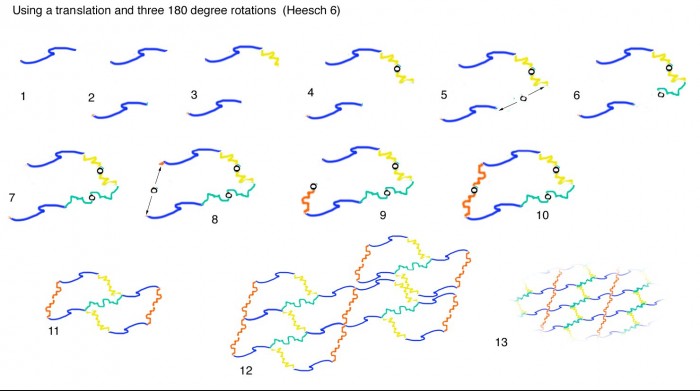
The next variant just adds another rotation:
This time there are two stages (5 and 8) at which you have to measure the centre point between loose ends, as the rotation point for the segment pair that joins them. As before, now at stage 11, your cell has to be duplicated, rotated 180 degrees and joined to your original cell, to make up a twosome that tiles by translation alone.
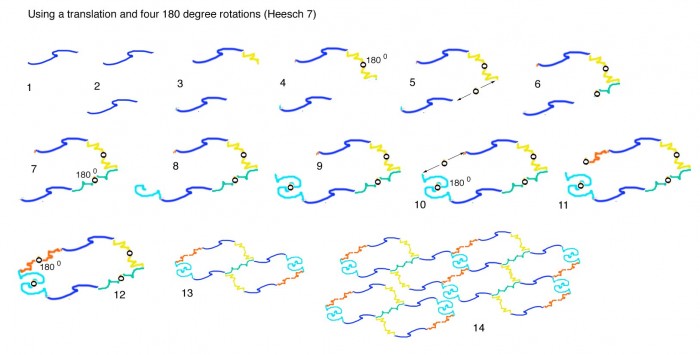
The next variant just adds yet another rotation:
Once again there are two stages (5 and 10) at which you have to measure the centre point between loose ends, as the rotation point for the segment pair that joins them. As before, this time at stage 13, your cell has to be duplicated, rotated 180 degrees and joined to your original cell, to make up a twosome that tiles by translation alone.
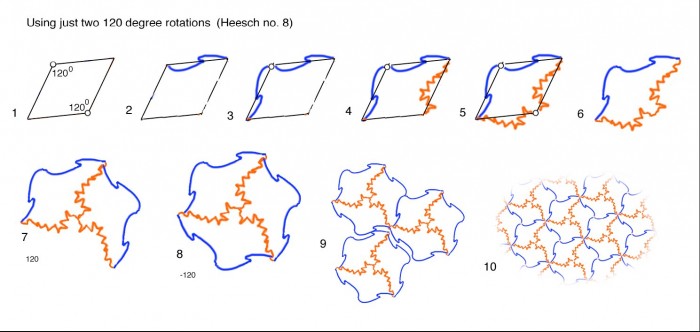
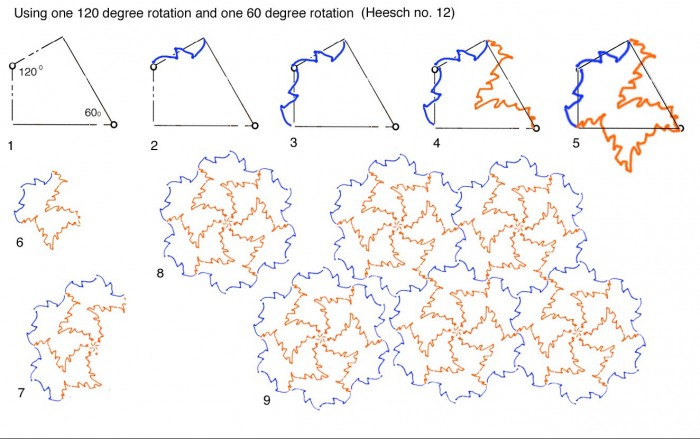
Now for a new degree of rotation, by 120 degrees.
This pattern is rigidly constrained in a diamond shape with large opposed angles of 120 degrees, and small ones of 60 degrees (always measuring the angle inside the loop). The easiest thing is to put in the diamond to start with as a template.
Note that at stage 7 your original cell has been joined to a copy rotated clockwise by 120 degrees. Then at stage 8 another copy, this time rotated 120 degrees anti-clockwise, completes a rosette that tiles by translation alone.
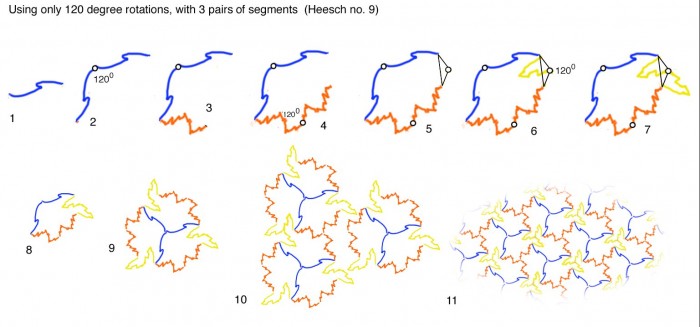
The next cell adds a third 120 degree rotation, to make a figure that can be allowed to become remarkably dog-legged, but gives very beautiful tessellations.
Note that at stage 5 you have to do something new. Instead of just marking a centre point between loose ends, you have to construct a triangle, with two thirty degree angles at the junctions with the loose ends, and a 120 degree angle at its apex. The apex is then the rotation point for the last pair of segments.
As before, your cell must be turned into a rosette, by joining with one copy to another rotated 120 degrees clockwise, and then both to another rotated 120 degrees anti-clockwise, in order to tile by translation alone.
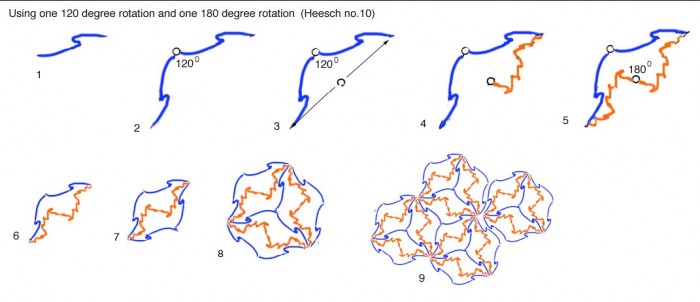
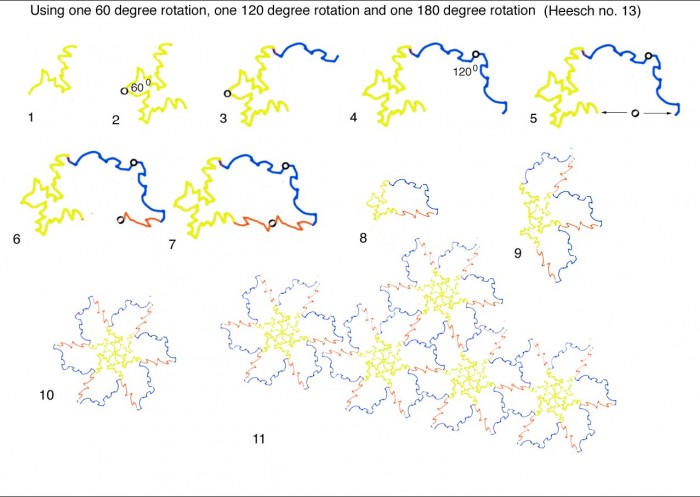
Now for a combination of different rotations:
As before, at stage five you measure the mid-point between loose segment ends, as the rotation point for the second pair of segments. You unit cell has then, at stage 7, to be joined to a copy rotated 180 degrees. Then at stage 8 the resulting twosome has to turned into a rosette by being joined to two copies of itself, one rotated 120 degrees, and the other rotated -120 degrees. The resulting rosette tiles by translation alone.
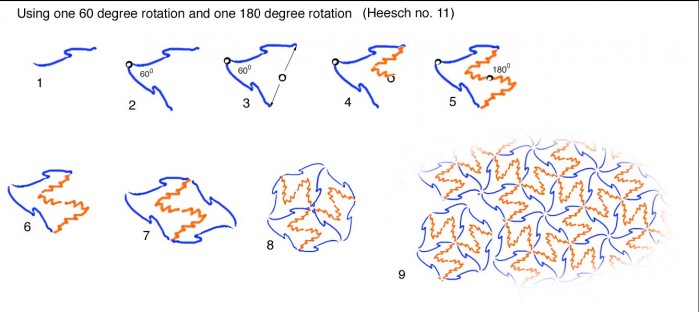
Next a different combination of rotations:
This is formed exactly as the previous example, except that now the angles concerned are 60 degrees and 180 degrees.
Yet another combination of rotations:
This time the angles are 120 degrees and 60 degrees, and the easiest way to construct the figure is to start with a diamond shaped template, at stage 1. The two unlabelled angles are each 90 degrees. To turn this figure into a rosette that tiles with translation alone, join your initial cell to two copies of itself, one rotated 60 degrees and the second rotated 120 degrees (stage 7). Then join the resulting half rosette to a copy rotated 180 degrees (stage 8).
Next a combination of three different rotations:
Here we revert, at stage 5, to marking the mid point between loose segment ends, as the rotation point for the last pair of segments. To turn the resulting cell into a tiling rosette, once again join the cell to two copies, (stage 9), one rotated 60 degrees anti-clockwise and the other clockwise, to form a half rosette. Then join that to a copy of it rotated 180 degrees (stage 10).
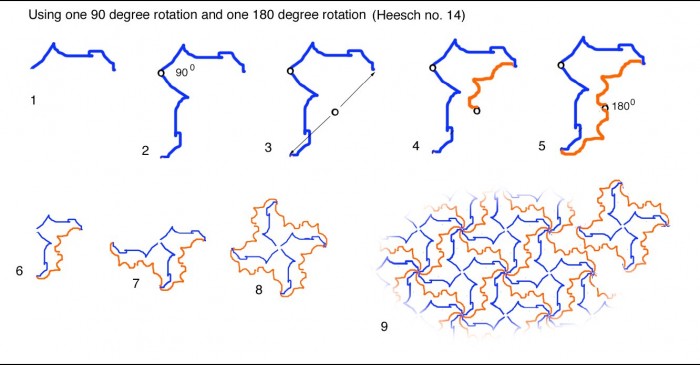
The next cell reverts to a combination of just two rotations:
Once again, this time at stage 3, mark the centre point of the loose segment ends as the rotation point for the last pair of segments. This cell has to be joined to a copy of itself rotated 90 degrees (stage 7), and the resulting half rosette joined to a copy rotated 180 degrees, to for a rosette (stage 8) which tiles by translation.
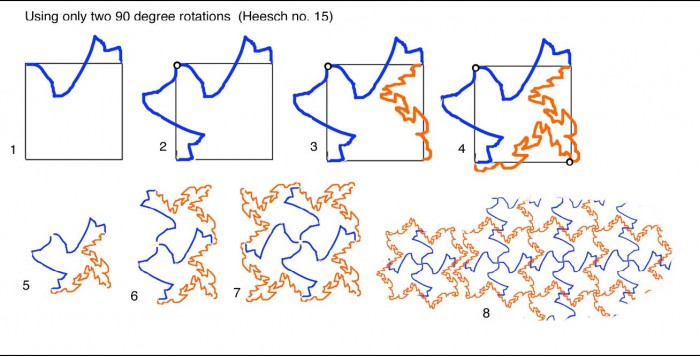
Next another combination of just two rotations:
This is another cell rigidly constrained within a square format, and the easiest construction of it begins with a square template, at stage 1. Turning the figure into a tiling rosette is as for the previous cell.
Then a final variation on combination of three pairs of rotated segments:
We revert at stage 6 to measuring the mid point between loose segment ends as the rotation point for the last pair of segments. Turning the resulting cell into a tiling rosette is as for the previous two examples.
Now we move on to glide reflections:
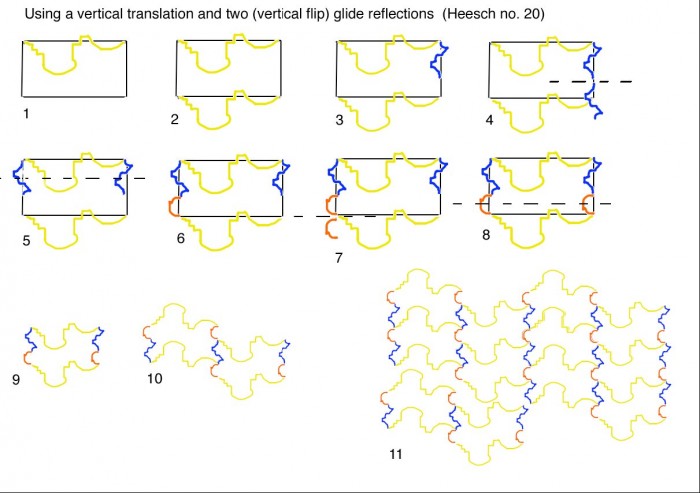
See above, end of introduction, for a detailed note on idiosyncracies of glide reflections. In these examples, note that at stages 2 and 4, segments are flipped horizontally. Then, at stages 3 and 5, the flipped segments are shifted downwards and joined to the lower end of the original segments. Then at stage 7 there is another glide reflection, as the single cell is joined to a copy once again flipped horizontally, and shifted vertically, to make a twosome that tiles by translation.
Next the same as above, but with an added pair of translated segments:
Once again, but now that at stages 2 and 4, segments are flipped horizontally. Then, at stages 3 and 8, the flipped segments are shifted downwards and joined to the lower end of the original segments. Then at stage 10 there is another glide reflection, as the single cell is joined to a copy once again flipped horizontally, and then shifted vertically, to make a twosome that tiles by translation.
Next a translated pair of segments at right angles to a glide reflected pair:
This is another cell rigidly constrained within a rectangle, and the simplest way to construct it is to start with a rectangle at stage 1 as a template. The glide reflected segment is again flipped horizontally, at stage 4, and shifted vertically, at stage 5, but the two glide reflected segments do not join up in this case. The style of glide reflection at stages 4 and 5 is repeated at stage 7 to glide reflect the two unti cells into a twosome that tiles by translation.
Next two parallel glide reflections, as above joined by a simple translation:
This is another cell best constructed on an initial rectangular template, at stage 1. Note that this time the glide reflected segments are flipped vertically, at stages 4 and 7, before being shifted horizontally, to join up with the loose ends of the translated segments. At stage 10, as in the previous examples, the resulting cell is flipped horizontally and shifted vertically, to form a twosome that tiles by translation at stage 11.
This gets simpler again, a combination of a glide reflection and a rotation:
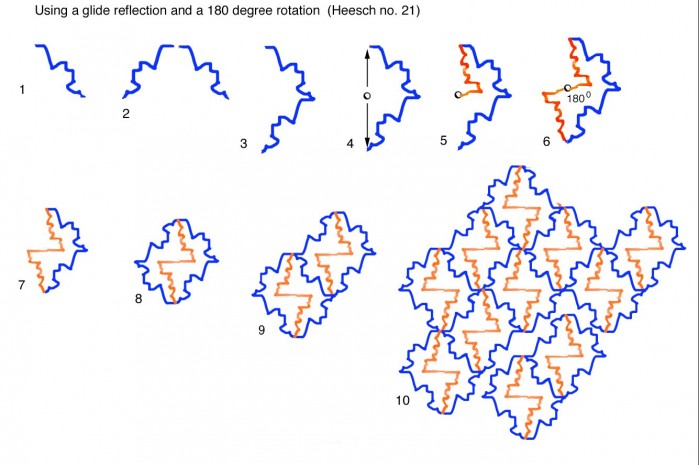
The glide reflection is again a horizontal flip (stage 2) followed by a vertical shift to join the two segments (stage 3). Then we are back to measuring the mid-point between loose ends, at stage 4, as the rotation point for a 180 degree rotation. The resulting cell is then joined to a copy rotated 180 degrees, at stage 8. Then that twosome is joined to a copy glide reflected, at stage 9, again with a horizontal flip and a vertical shift, to form a foursome that tiles by translation alone.
Next the same again but with two rotations connecting the glide reflection:
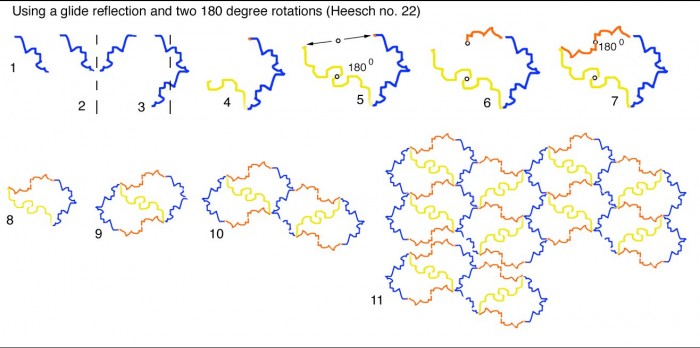
Much as for the previous cell, the glide reflection is again a horizontal flip (stage 2) followed by a vertical shift to join the two segments (stage 3). Then we are back to measuring the mid-point between loose ends, but now not till stage 5, as the rotation point for, this time, a second 180 degree rotation. The resulting cell is then joined to a copy rotated 180 degrees, at stage 9. Then as before that twosome is joined to a copy glide reflected, now at stage 10, again with a horizontal flip and a vertical shift, to form a foursome that tiles by translation alone.
Now a glide reflection and a rotation connected by a simple translation:
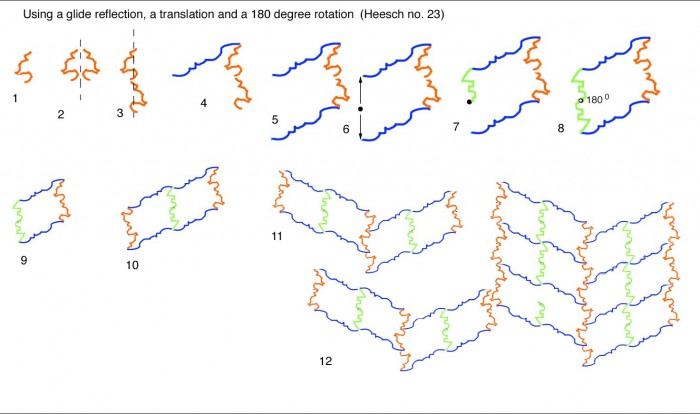
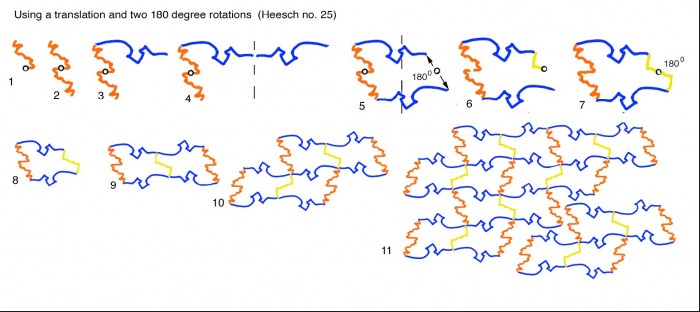
Just as before, the glide reflection is a horizontal flip (stage 2) followed by a vertical shift to join the two segments (stage 3). Then after inserting a translated pair of segments (stages 4 and 5), we are back to measuring the mid-point between loose ends, (stage 7), as the rotation point for a 180 degree rotation. The resulting cell is then joined to a copy rotated 180 degrees, at stage 10. Then as before that twosome is joined to a copy glide reflected, now at stage 11, again with a horizontal flip and a vertical shift, to form a foursome that tiles by translation alone.
Next the same again but with two 180 degree rotations:
The procedure is identical to the one before, except that measuring the mid-point between loose ends is postponed to stage 8. The procedure for turning a single cell into a foursome that tiles by translation is again exactly as before.
Now a glide reflection with two flanking 180 degree rotations:
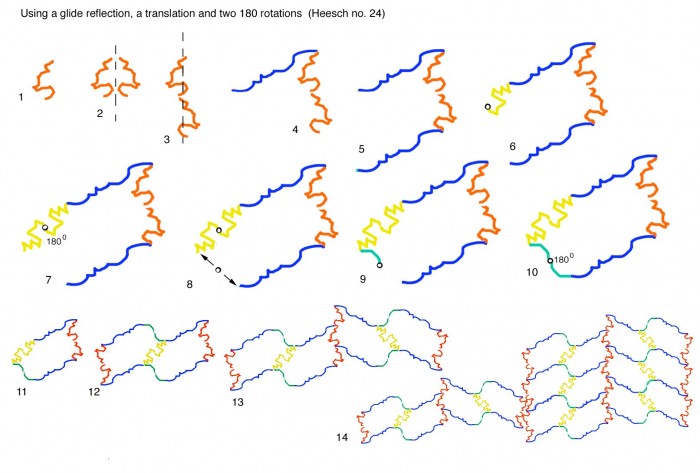
The glide reflection at stage 4 is a horizontal flip, followed by a vertical shift, but with the glide reflected segments separated to connect the flanking rotations, rather than connected to one another. As before at stage 5 we measure a mid-point between loose ends to markj the rotation point for the remaining 180 degree rotation. The final cell is, as before, joined to a copy rotated 180 degrees, at stage 9, before the resulting twosome is glide reflected, again with a horizontal flip followed by a vertical shift, to make a foursome that tiles by translation alone.
Next two glide reflections, but at right angles to one another:
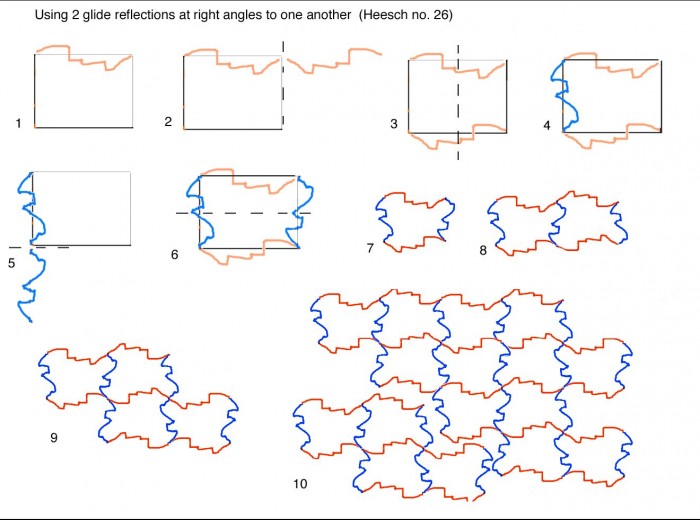
This is the last of the cells that are best constructed within an intial rectangular template. The first glide reflection is a horizontal flip (stage 2), followed by a vertical shift (stage 3). The second is a vertical flip (stage 5), followed by a horizontal shift (stage 6). The resulting single cell is then first connected to a copy glide reflected, at stage 8, with a vertical flip, followed by a horizontal shift. The twosome is then joined to a copy (stage 9) glide reflected with a horizontal flip, followed by a vertical shift. The foursome then tiles by translation alone.
Then as above glide reflections at right angles, but now joined by a translation:
This is as for the previous example, except that we end up with a gap at stage 7, as before for the mid point to be measured as the rotation point for the last 180 degree rotation. Then once again the final cell is joined to a glide reflected copy, with a horizontal flip and a vertical shift (stage 11). That twosome is then joined to a copy glide reflected with a vertical flip and a horizontal shift (stage 12) to form a foursome that tiles with translation alone.
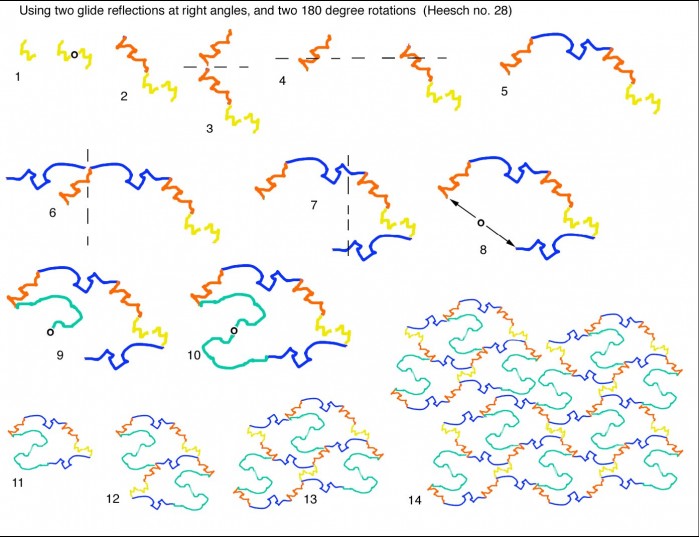
Finally a real hum-dinger, with glide reflections at right angles joined by two 180 degree rotations.
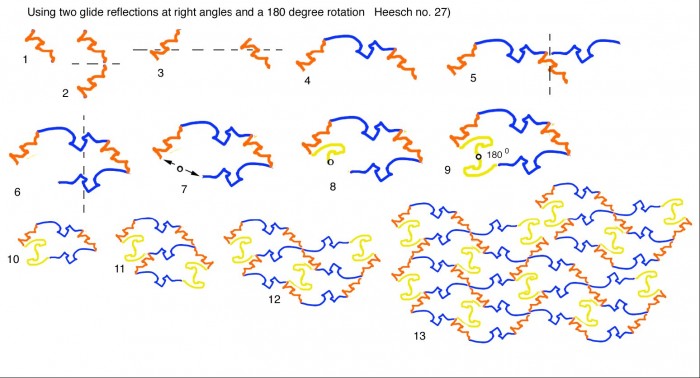
The first glide reflection is a vertical flip (stage 3, followed by a horizontal shift (stage 4). The second glide reflection is a horizontal flip (stage 6), followed by a vertical shift (stage 7). At stage 8 as before we find the mid-point between loose ends, as the rotation point for the final 180 degree rotation. The last stages are as for the previous cell, a glide reflection with horizontal flip followed by vertical shift, to form a twosome that is then joined to a copy glide reflected with a vertical flip followed by a horizontal shift. The foursome then tiles by translation.
Got it?
Have fun trying these out. Once you’ve got the hang of what you can do following the rules, I’ll be following this with a post about effects you can get by breaking them a bit.
